


Table of contents
- Overview:
- Set hostnames for nodes (optional):
- Set networking:
- Enable modules and configure networking:
- Containerd runtime installation and configuration (control node):
- Install Kubernetes (control node):
- Install Kubernetes on worker nodes
- Initialize the Kubernetes cluster on the control node
- Join worker nodes to the cluster
- Notes:
- Reference:
Overview:
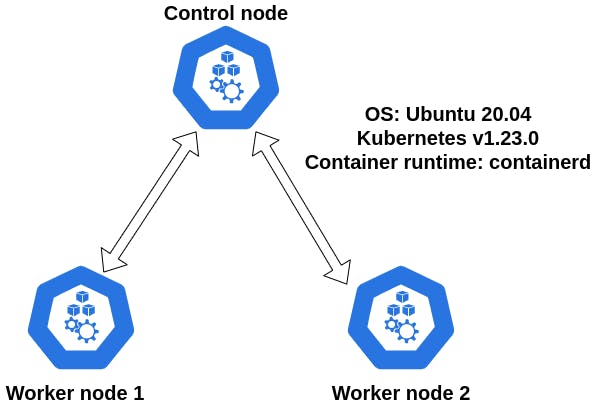
- Control and worker nodes OS: Ubuntu 20.04
- Container runtime: containerd
- Kubernetes version 1.23
- Testbed scheme:
Set hostnames for nodes (optional):
- Log in to the control node and set a user-friendly hostname:
sudo hostnamectl set-hostname k8s-control - Log in to the worker node 1 and set a user-friendly hostname:
sudo hostnamectl set-hostname k8s-worker-1 - Log in to the worker node 2 and set a user-friendly hostname:
sudo hostnamectl set-hostname k8s-worker-2 - The hostname changes to take effect logout and log back in:
exit
Set networking:
To make your worker and control nodes talk to each other via hostnames we need to edit /etc/hosts file. To edit the file use the sudo vi /etc/hosts command. The following entries must be added to all nodes:
[control_node_private_ip] [control_node_hostname]
[worker_node1_private_ip] [worker_node1_hostname]
[worker_node2_private_ip] [worker_node2_hostname]
Enable modules and configure networking:
- On control node enable the
overlayandbr_netfilterkernel modules forcontainerd:cat << EOF | sudo tee /etc/modules-load.d/containerd.conf overlay br_netfilter EOF - Enable the modules (control node):
andsudo modprobe overlaysudo modprobe br_netfilter - Edit the
99-kubernetes-cri.conffile to make sure Kubernetes networking works as expected (control node):cat <<EOF | sudo tee /etc/sysctl.d/99-kubernetes-cri.conf net.bridge.bridge-nf-call-iptables = 1 net.ipv4.ip_forward = 1 net.bridge.bridge-nf-call-ip6tables = 1 EOF - Reload the configuration file:
sudo sysctl --system
Containerd runtime installation and configuration (control node):
- Install containerd runtime:
sudo apt-get update && sudo apt-get install -y containerd - Create configuration directory for containerd:
sudo mkdir -p /etc/containerd - Generate default configuration file:
sudo containerd config default | sudo tee /etc/containerd/config.toml - Restart the containerd:
sudo systemctl restart containerd - In order Kubernetes to work disable swap:
sudo swapoff -a - Check
fstabfile if swap is disabled:sudo cat /etc/fstab
Install Kubernetes (control node):
- Install required packages for Kubernetes:
sudo apt-get update && sudo apt-get install -y apt-transport-https curl - Add GPG key for Kubernetes package repository:
curl -s https://packages.cloud.google.com/apt/doc/apt-key.gpg | sudo apt-key add - - Set Kubernetes repository entry in apt list:
cat << EOF | sudo tee /etc/apt/sources.list.d/kubernetes.list deb https://apt.kubernetes.io/ kubernetes-xenial main EOF - Update the packages:
sudo apt-get update - Install Kubernetes components:
sudo apt-get install -y kubelet=1.23.0-00 kubeadm=1.23.0-00 kubectl=1.23.0-00 - Mark installed packages from the automatic update. This allows us to make manual updates on the components.
sudo apt-mark hold kubelet kubeadm kubectl
Install Kubernetes on worker nodes
To install Kubernetes on worker nodes repeat the steps starting from networking setup up until Kubernetes installation as was shown above for control node. To facilitate the process you can use terminator terminal to type in parallel.
Initialize the Kubernetes cluster on the control node
- On the control node initialize the Kubernetes cluster:
On success you will see the following message:sudo kubeadm init --pod-network-cidr 192.168.0.0/16 --kubernetes-version 1.23.0
- Setup the
kubeconfig:mkdir -p $HOME/.kube sudo cp -i /etc/kubernetes/admin.conf $HOME/.kube/config sudo chown $(id -u):$(id -g) $HOME/.kube/config - Check if you are able to reach the nodes:
you should see only the control node:kubectl get nodes
- Setup the Kubernetes networking. install calico networking plugin:
kubectl apply -f https://docs.projectcalico.org/manifests/calico.yaml - Get the join token for the cluster:
kubeadm token create --print-join-command
Join worker nodes to the cluster
- On the worker nodes execute the following command:
kubeadm join [private_ip_of_control_node]:6443 --token [token] --discovery-token-ca-cert-hash [hash] - On success you should see the following message:

- Go to the control node and check if nodes have joined the cluster:
on success you should see the following message (wait until nodes are up and running):kubectl get nodes
Notes:
br_netfiltermodule is required to enable transparent masquerading and to facilitate Virtual Extensible LAN (VxLAN) traffic for communication between Kubernetes pods across the cluster. If you need to check whether it is loaded reference- An overlay-filesystem tries to present a filesystem which is the result over overlaying one filesystem on top of the other. Overlay Filesystem
- Use the
modprobecommand to add or remove modules on Linux. The command works intelligently and adds any dependent modules automatically. The kernel uses modprobe to request modules. How To Use The Modprobe Command In Linux - phoenixNAP /etc/sysctl.conf- Configuration file for setting system variablesswapoffdisables swapping on the specified devices and files. When the -a flag is given, swapping is disabled on all known swap devices and files (as found in /proc/swaps or /etc/fstab). Linux swapon and swapoff command.- Your Linux system's filesystem table, aka
fstab, is a configuration table designed to ease the burden of mounting and unmounting file systems to a machine. It is a set of rules used to control how different filesystems are treated each time they are introduced to a system. An introduction to the Linux /etc/fstab file apt-mark holdis used to mark a package as held back, which will prevent the package from being automatically installed, upgraded or removed. apt-mark - show, set and unset various settings for a package- Calico enables Kubernetes workloads and non-Kubernetes or legacy workloads to communicate seamlessly and securely. About Calico